Calling this a ‘walkie’ is really pushing our self-made definition, but our first attempt at mountaineering was an incredible experience that we wanted to share. It was an extraordinary challenge, an introduction to a bunch of new skills, and at the end of it, an unbelievable vista along the spine of the Andes. We have absolutely minimal experience with anything snow related – we’ve both been skiing once and have panicked memories of bruised knees and uncontrolled descents. We’ve never had an ice axe in hand or had to walk with crampons. However, that won’t stop you from summiting Huayna – just ensure you’re decently fit and well determined.
Keeping it
short and sweet
Description
One of the ‘easiest’ 6000m+ peaks in the world. There are many agencies in La Paz running safe, guided ascents of Huayna Potosi over 2 or 3 days. As the base area of the Andes is already so high, at both the base camp and high camp you’ll sleep in a refugio rather than a tent, which helps make the final ascent that much easier. The distances themselves are minimal, and summit day is a non-technical climb through the snow of 700m – 800m, depending on what company you ascend with and which base camp they use.
Climate
Drier, clearer skies in winter (April – October), wetter and warmer in summer (November – March). High altitude mountaineering, so very changeable weather. Cold all the time.
Distance
5km
Elevation
4775m – 6088m
Costs
We went with Jiwaki (reputable, neon green) and paid 1000bol pp, plus 350 bol in tips. There’s also an entry fee to the Huayna Potosi area (20 – 50 bol, can’t remember exactly!)
Track
Ascending to base camp is rocky, only the last part is snowy. For the summit, you’ll be kitted up in waterproof gear, boots, ice axe and crampons.
Facilities
Flushing toilets and refugios at both camps.
Notes
While quoted as one of the easiest 6000m+ peaks, it doesn’t mean this summit is easy. The whole ascent is at a very high altitude, so you’re very likely to be impacted in some way, even with good acclimatisation. Do not forget your own snacks for the final ascent!
Day 0
Sorata – Lackathiya (9.4km, 1500m ascent, 330m descent) – we skipped this day, but the track and the road are the same. If you take this route, there is a lot of ascent with a big pack. If you want to skip as we did, the taxi to Lackathiya was 150bol.
Day 1
Travel from La Paz to Huayna Potosi basecamp; meet all your fellow mountaineers, start getting hyped! After lunch, you’ll get all your gear on and gear to the low-altitude glacier to practice your basic snow skills – styles of ascending and descending in crampons, working with the ice axe, and a little bit of fun abseiling and climbing an ice wall! Get an early night in the cosy base camp to acclimatise well.
Day 2
Spend the morning relaxing – you’re still at about 4700m, so just walking around can be tiring. To get to lunch, carry all your gear to the high camp – the refugios are less fancy than the base camp, but a damn sight better than sleeping in a tent! Get a very early night (like, 6–7pm) because you’ll be waking up at 1am the next ‘morning’ to make your ascent before the sun rises.
Day 3
1am start, out and on the mountain at 2am. You should be two people to one guide – roped up and harnessed in. Expect to see a trail of lights heading up the mountain, but unless you’ve got moonlight, you won’t really be able to see where you’re going. Trust your guide to know the trail, and focus on keeping yourself fueled and headache-free with sweets and water and big, deep breaths. The climb take 4-6 hours, depending on your speed, but if your body agrees, you should make it to the top to see one of the most incredible sunrises of your life. Descend in a couple of hours, booking it down to get out of the heating sun (and melting snow). You’ll have lunch at the refugio, then descend to base camp with the rest of your group. Jump in a van and have a nap (or not – the road is pretty horrendous) on your trip back to La Paz.
Tell me everything
You read about all kinds of activities on blogs on the internet, but some are still inspired by social media. Our aspirations to summit Huayna Potosi born on Instagram – the challenge thrown unknowingly by someone we’d met in Patagonia, in the form of a story picturing a stunning summit. When we enquired about the excursion, he said it was the ‘hardest thing he’d ever done’ – well, that’s a tagline if I’ve ever heard one, so we were absolutely intrigued at the possibliltiy of a new challenge and a new outdoor hobby. The same person highly recommended his chosen company – Jiwaki – for competitive prices, good vibes and good equipment and attention to safety… something that can be a little lacking for activities in Bolivia.
Step 1: Pick your agency and # days
Along the street of Sagarnaga in La Paz, there are an absolute plethora of tour companies offering excursions up Huayna Potosi. Excursions of 3 days are best if you have no experience with mountaineering, as the additional day gives you an overview of basic techniques (and a little fun in the snow). It’s also a better bet for summiting, as you have an additional night of acclimatisation. La Paz is at ~3600m, base camp at ~4700m, high camp at ~5200m and the summit at 6088m. The two day excursion will see you sleep at high camp, and ascend the next day – which is doable, but really only a good idea if you’re experienced and have acclimatised in some other way. Even though we had done the Condoriri (sleeping 4 nights at 4600m) a few days before, we struggled with the altitude on the ascent to the summit, both with nausea and general lack of focus.
We will also recommend Jiwaki. Their prices are great at 1000pp (but tip your guide well!) for three days, it seems to attract people with really good vibes (or at least, we got luck with a great group of people), the gear is good quality (we really wanted to steal the fleeces they lent out…) and the facilities are great. While the other agencies tend to share the refugios, Jiwaki is popular enough that only Jiwaki clients will be in the refugio – it’s a little more exclusive, which could be a good or a bad thing, but we thought it was still super social and it was nice that all the guides and helpers seemed to know each other and get along well. Whatever company you pick, as there are cheaper options, the absolute most important thing is the guide:client ratio. You should have at maximum two people to a guide. The advantage of only having two people to a guide is helping other people finish. If one in a pair needs to return, the other person can be hooked onto another group, giving three people to a single guide, which is the real maximum of safety. If you’re going much cheaper, it may be worth asking to see the quality of the gear.
Step 2: Start your tour!
You don’t need any specialty gear for Huayna Potosi – we had a lot of warm gear already, because we’re centring all this travel around hiking, but the company should supply you with legging thermals and fleece, snow jacket and pants, mittens, hard booties for the snow, crampons, ice axe, helmet… all of the essentials for climbing a mountain. They’ll also hire out sleeping bags and liners to sleep in. Keep in mind that you will need to carry all of this with you from base camp to high camp, so don’t bring too much extra stuff – your bag may be empty as hell when you arrive, but all the snow gear packs out big and isn’t very light.
If it wasn’t clear, we recommend the 3 day tour for two reasons – the first is that mucking around on the glacier with all your gear is fun! It’s a great way to get a taste of basic skills like walking up different steepness of ice with crampons, using the ice axe to help you ascend and descend, walking while harnessed up to others, and generally feeling like a bit of a badass. The activity ends with a bit of ice climbing – which is actually so hard! Emma found the technique of getting your crampons into the ice a bit beyond her, though Awal got a decent way up, but we both really enjoyed a little challenge and a different activity. It’s also great for bonding with/heckling at your newfound climbing friends.

The second reason it’s a nice idea is that sleeping at altitude is the best way to acclimatise. A whole extra day is going to give your body more time to sort out its red blood cell count and adapt to the lack of oxygen in the air, which in turn makes it far more likely that you will make the summit. However, even if you don’t make the summit, getting onto the mountain and attempting it is an achievement; there was one fullah in our group who was mountain climbing and motorcycling his way around South America, living by this exact sentiment – you can’t expect to summit every peak, even as someone with more experience, so just enjoy every challenge and always, always listen to your body and respect your own limits. The mountains are not forgiving.
Whichever tour you take, it should be mentinoed that the drive from La Paz to Huayna Potosi is not a comfortable; the roads are fairly shoddy, so you’ll be bumping around a fair bit, and it’lll take a bt longer than you expect.
Day two of three is also fairly relaxed – you get a late wakeup, a big breakfast, and all morning to laze around and chat. Before lunch, you’ll head back out onto the mountain, ascending to high camp for lunch, dinner and an early night.. However, whereas the previous day you were all geared up, this day you get to ascend in your own selection of clothes – and most importantly, your own boots! We both found that walking in the multi-layered snow boots on day 1 (without crampons) was way more clunky than our usual hiking boots. Hefting all the snow gear up the hill can be a bit difficult if you’re not well balanced, so if you have the option to bring your own 50L (minimum) pack, we would definitely recommend it. The trail itself is very well trod, though ascending from 4700m under any conditions will always be a little hard on your lungs. Take it at your own pace and enjoy whatever views back over the valley you can get! It’s more relaxing at the high camp, until an early dinner and an early night.
Day three is the day! And it’s a long one. Apparently (news to us, but it makes sense in hindsight), any snow climbing is best done in the cool of the night. It’s not just to get you to the summit for the sunrise (although, that is fully worth it), but that once the sun rises, it will begin to melt the snow, which can then solidify into ice – either way, making walking very slippery. We were up at 1am for some semblance of breakfast, then on the trail before 2am. The ascent takes 4-6 hours, depending on your fitness and how your body goes with the altitude. The most important thing is just to be conscious of how you’re feeling – a little bit of sugar will always go a long way if you’re starting to feel a little funky.
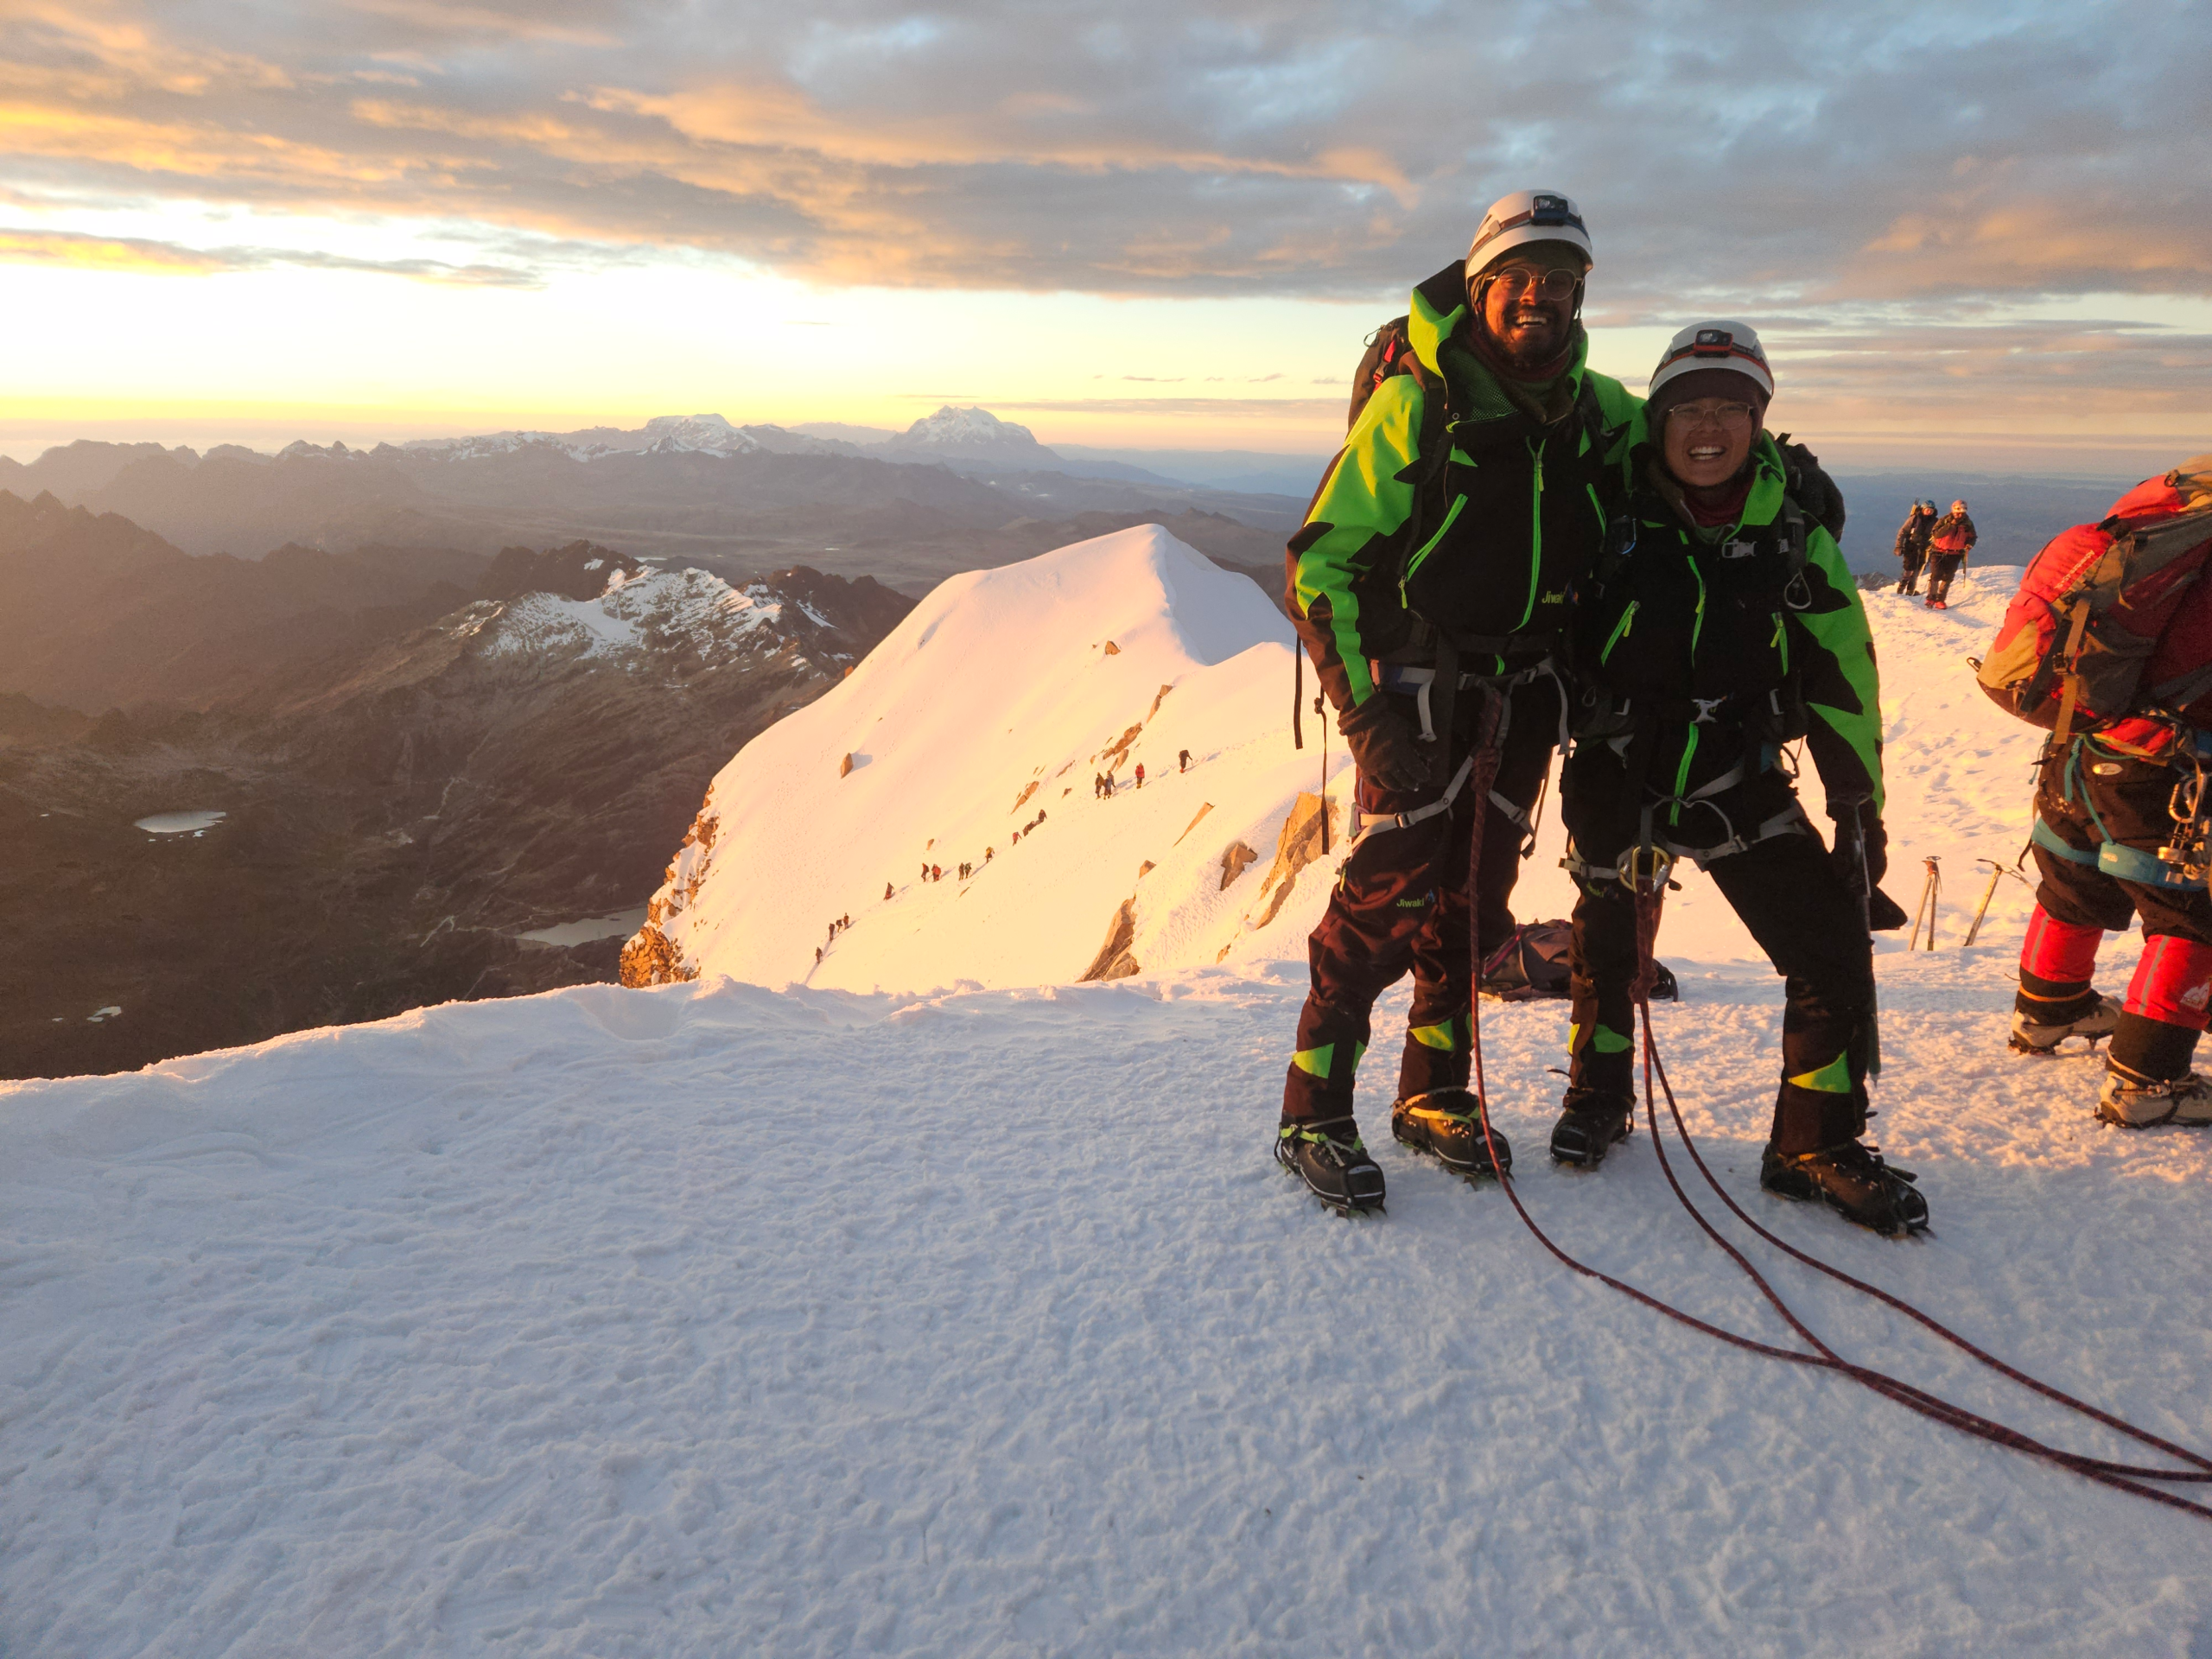
We were lucky and had outstanding weather. Clear skies, no wind, but a little fresh snow from the evening before. This meant it never got too cold (we had friends who did it in some much colder conditions a couple of weeks later – their hair was freezing in the air!). However, even with all these perfect conditions – it really was a true challenge. We took lots of breaks – breaks with the bigger Jiwaki group when it was convenient, but also our own breaks to catch our breath, eat a little something or take a drink. We both got random bouts of nausea on the way up, but found that just putting one foot in front of the other, breathing deeply and consistently, were about all we could focus on. To be honest, it’s a little bit like meditating because of the brain fog. Our guide, Tio Silverio, offered encouragement, but in the end having each other’s support was the most important thing to getting us to the summit. Genuinely, most of it is just walking straight through the snow nice and slowly. There are a couple of steep sections where you need to walk on an angle, and another couple of sections where we had to use the ice axe – which was pretty cool. We felt pretty badass amongst the altitude fog.
It took us nearly six hours to reach the summit – not fast, but consistency is the key. Don’t worry about anyone else’s pace. Do your own thing. Rock your own vibe. The view from the summit on a clear day is mindblowing. The sun had only just risen when we reached the summit, so we still got some of that golden hour. You get a 360 degree view, of course, with the Amazon bowl stretching to the east (though usually covered in cloud), and the plains of Bolivia stretching westward below you. It’s such a crazy perspective being so high, made more mad by the elation of reaching the summit – though be warned, Awal gets vertigo in general, and it turns out that mountaineering and being up 2000m or so from our surroundings will trigger that… Some combination of the exhaustion and elation and the lack of oxygen meant that Emma was also a bit out of it. Our photos of our highest achievement are a little potato, but that’s just a good representation of how we felt!
Two essential things here for the ascent: bring your own snacks and store them somewhere accessible for the summit (any movements are difficult, and brain capacity is a bit low), and do not rely only on a bladder! We don’t actually travel with waterbottles, as our filters attach to our bladders – however, even in the mild conditions we walked in, the tubes on our bladders froze, meaning we couldn’t use them. Thankfully, there was a spare coke bottle at the high camp, which we used for the day.
After summiting, it was just a matter of absolutely booking it down. Our guide was keen to get us down quickly – to walk on a nicer trail, and because the summit area is fairly small, the companies seem to have some system to ensure not everyone is there at the same time. There’s a little flat spot below the summit, about 20 minutes downhill, so we stopped here and delayered, had a little more to drink, and then didn’t stop again before we reached the high camp. The trail was still in good condition as it was daytime but not heating up yet, and before most decending groups. We got there mostly without incident, although we all slipped down a few of the steeper sections and Awal did inexplicably faceplant on a flat bit around the glacier. Maybe he was just trying to keep our tio on his toes.
A third essential thing for the descent – while it’s a lot faster than the ascent, only a couple of hours, the brightness of the sun on the snow can still screw up your eyes. Make sure you have sunglasses (ESSENTIAL), and sunblock or a UV proof face wrap.
Once at high camp, it took another hour or two for the rest of our group to descend – while everyone made it to the summit, there were varying degrees of being affected by the altitude, so some people took longer than others. It’s common to get a little altitude cough from the dry, cold air, and the guides will tell you not to sleep while you wait – as you’ll wake up feeling totally hungover. Rest until everyone arrives, take a light ‘lunch’ (I think it must have been 10am) of soup and bread, then descend in normal gear again to the low camp. Then you’ll be heading back to La Paz – no matter what altitude you reached, with a sense of achievement and pride – because the mountains are ruthless, and we always have to respect them!


![Essential Guide to the O-Circuit in Torres Del Paine | [2024/2025]](https://worldwide-walkies.com/wp-content/uploads/2025/03/20250126_112657-2-scaled.jpg)